Shopify Integration
Install the Amaspace Customizer and add an interactive 3D product to your Shopify store in under 10 minutes. https://apps.shopify.com/amaspace
By the end of this guide, you’ll have Amaspace installed, added to your theme, and visible on your storefront.
Step 1 — Connect your Shopify store to Amaspace
After installing the app you will be automatically redirected to the Amaspace platform.
If your Shopify store is already connected, you’ll go straight to your Amaspace dashboard.
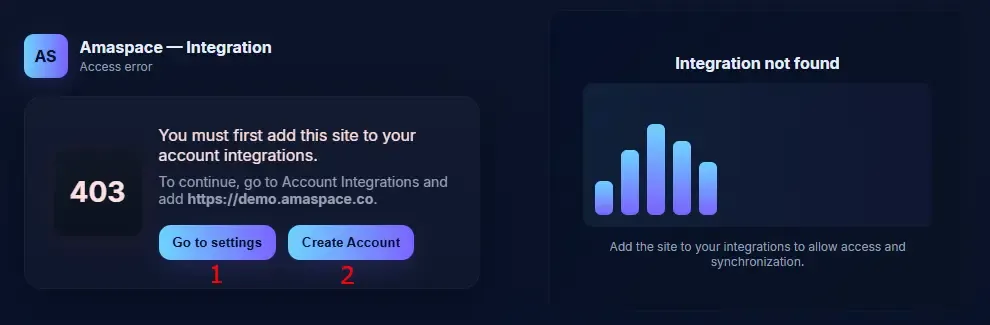
If not, you’ll see an “Access error (403)” card with two buttons:
-
Create Account – if you’re new to Amaspace
-
A new Amaspace account is created automatically using your Shopify details.
-
Your Shopify store is added to Account Integrations and linked to this account.
-
Go to settings – if you already have an Amaspace account but no integration
-
You’ll be redirected to Account Integrations: https://app.amaspace.co/integrations .
-
Add this Shopify store to your integrations and save.
Step 2 — Choose your pricing plan
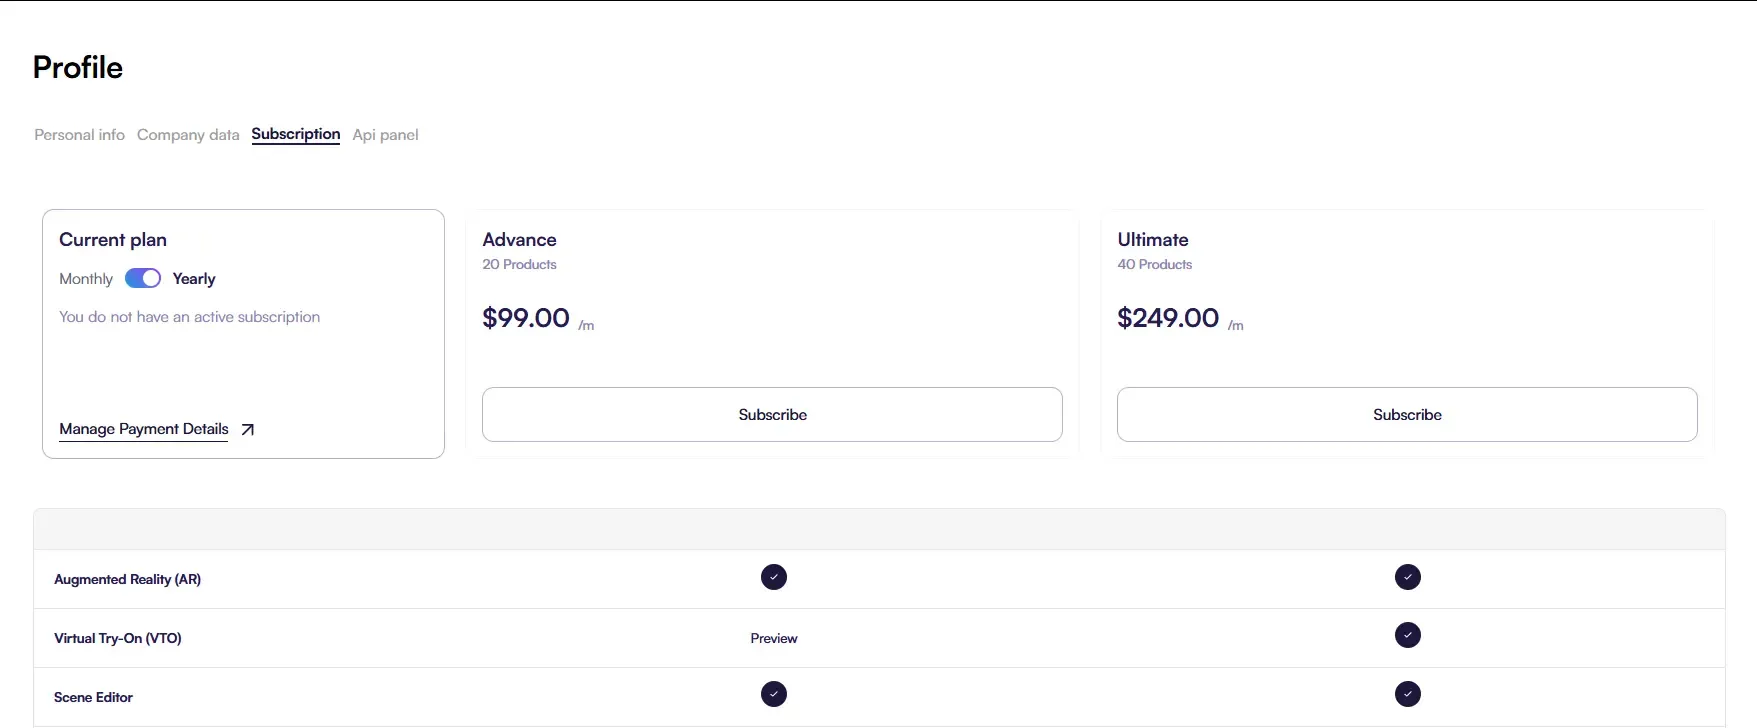
- After connecting, you’ll be redirected to the pricing plans page.
- Review the features in each plan and choose the one that fits your needs.
- Confirm the plan to unlock Amaspace features.
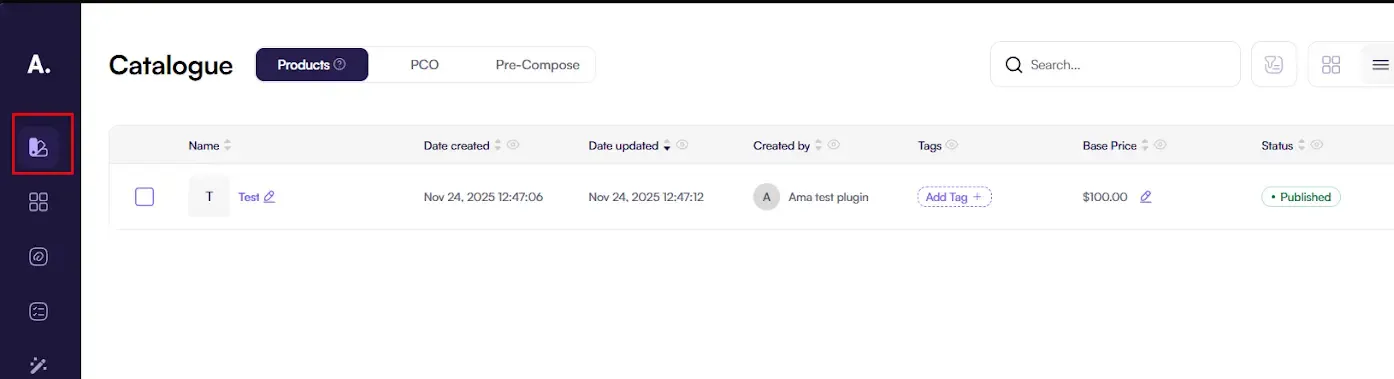
Step 3 — Create a product in Amaspace
-
Go to the product catalog: https://app.amaspace.co/catalog
-
Click Create product.

-
Choose how you want to add a 3D model:
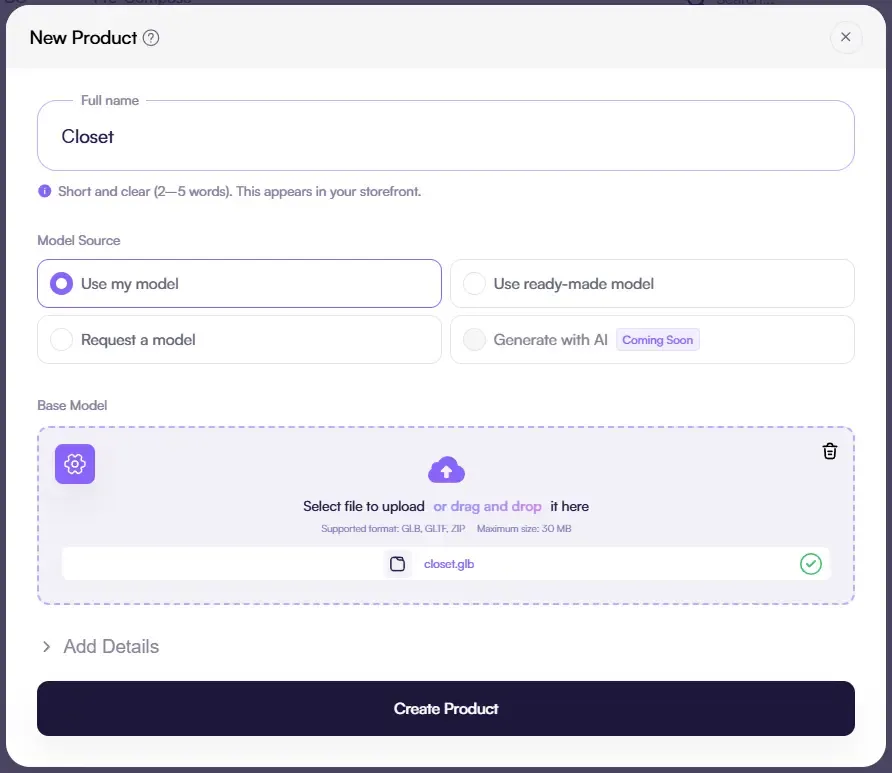
- upload your **own 3D model - **Use my model,
- use a model from our **product library - **Use ready-model,
- or request a custom 3D model from our team - Request a model.
- Fill “Full name” product field and “Details” (optional) and save.
- For advanced configuration (options, materials, rules, animations), see our detailed 3D configuration guide
Step 4 — (Optional, recommended) Link your Amaspace product to a Shopify product
This step lets the configurator:
- appear automatically on a specific Shopify product page,
- save each configuration as a variant of that product (instead of creating a new product every time).
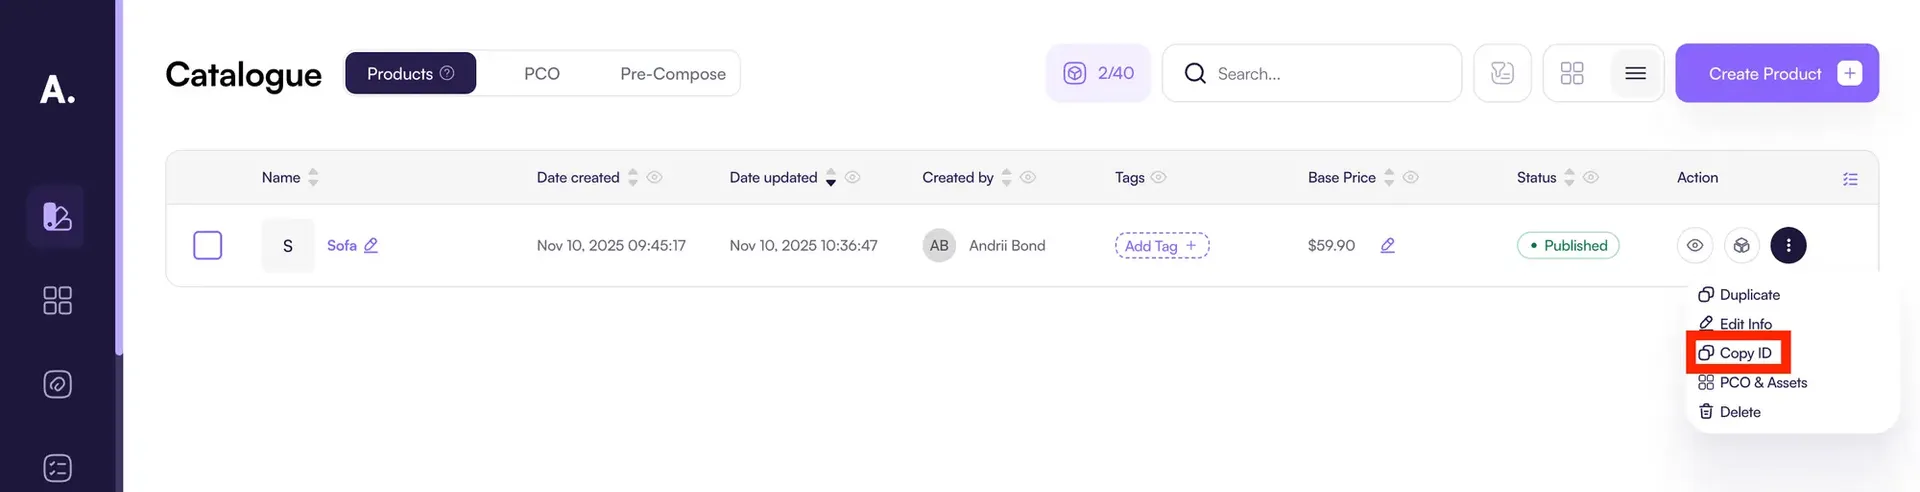
- In Shopify admin, open Products → [your product] and copy the product ID from the URL.
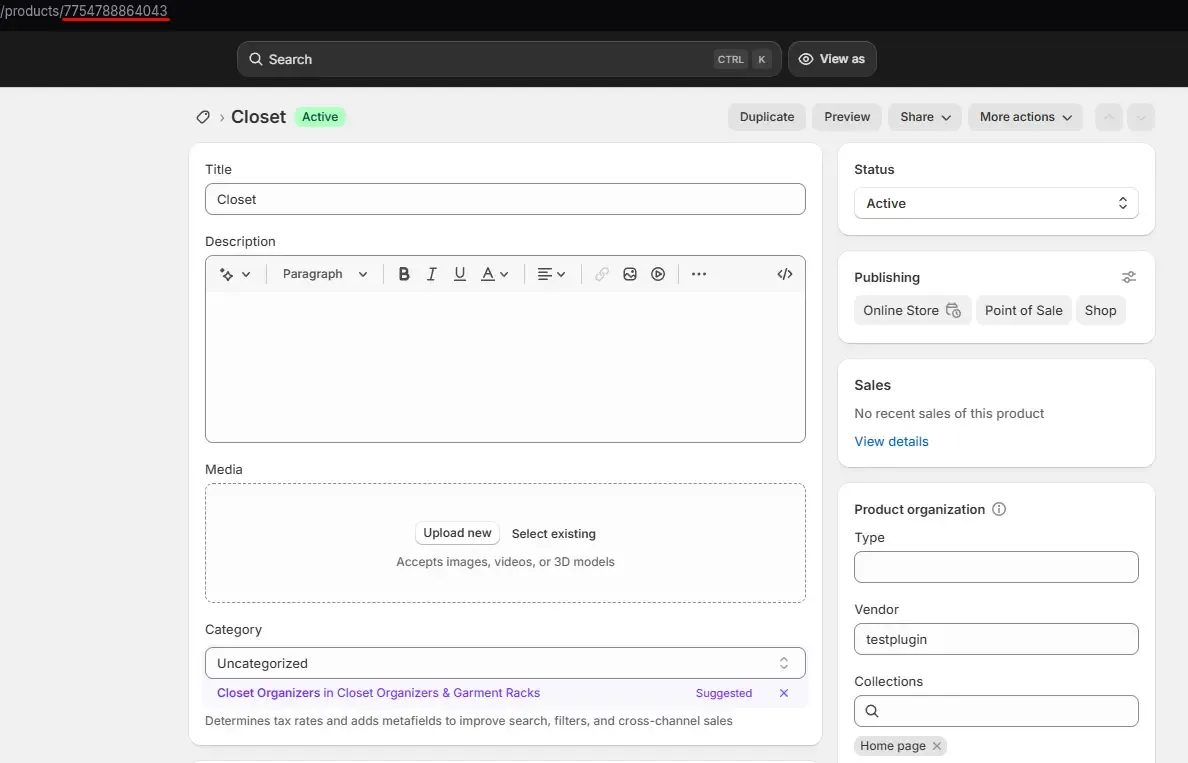
-
In Amaspace, go to https://app.amaspace.co/catalog, open the product and switch to PCO & Assets.
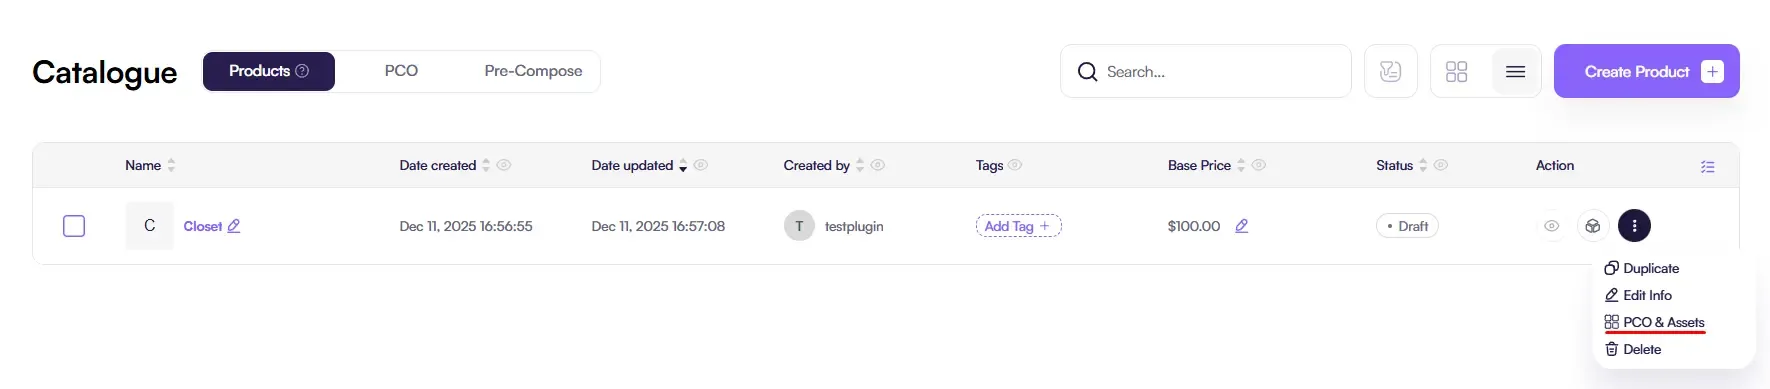
-
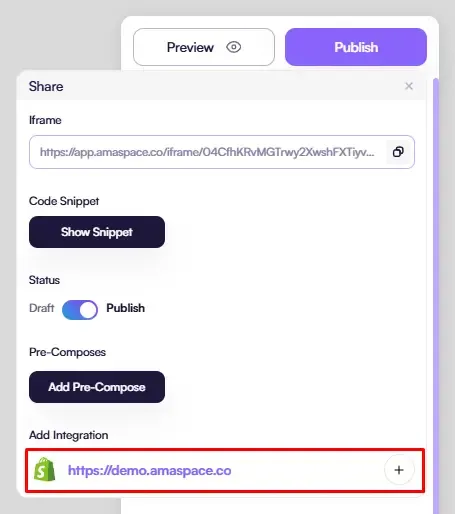
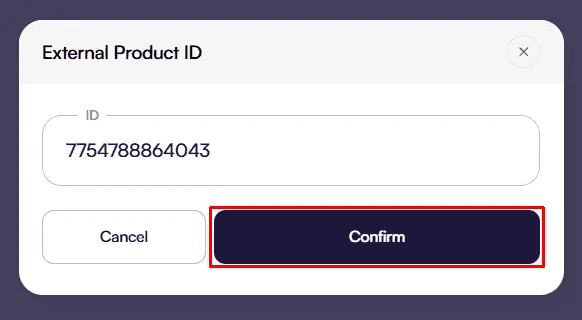
Click Publish → Shopify integration and paste the Shopify product ID, then save.
Step 5 — Add the configurator to your Shopify theme
-
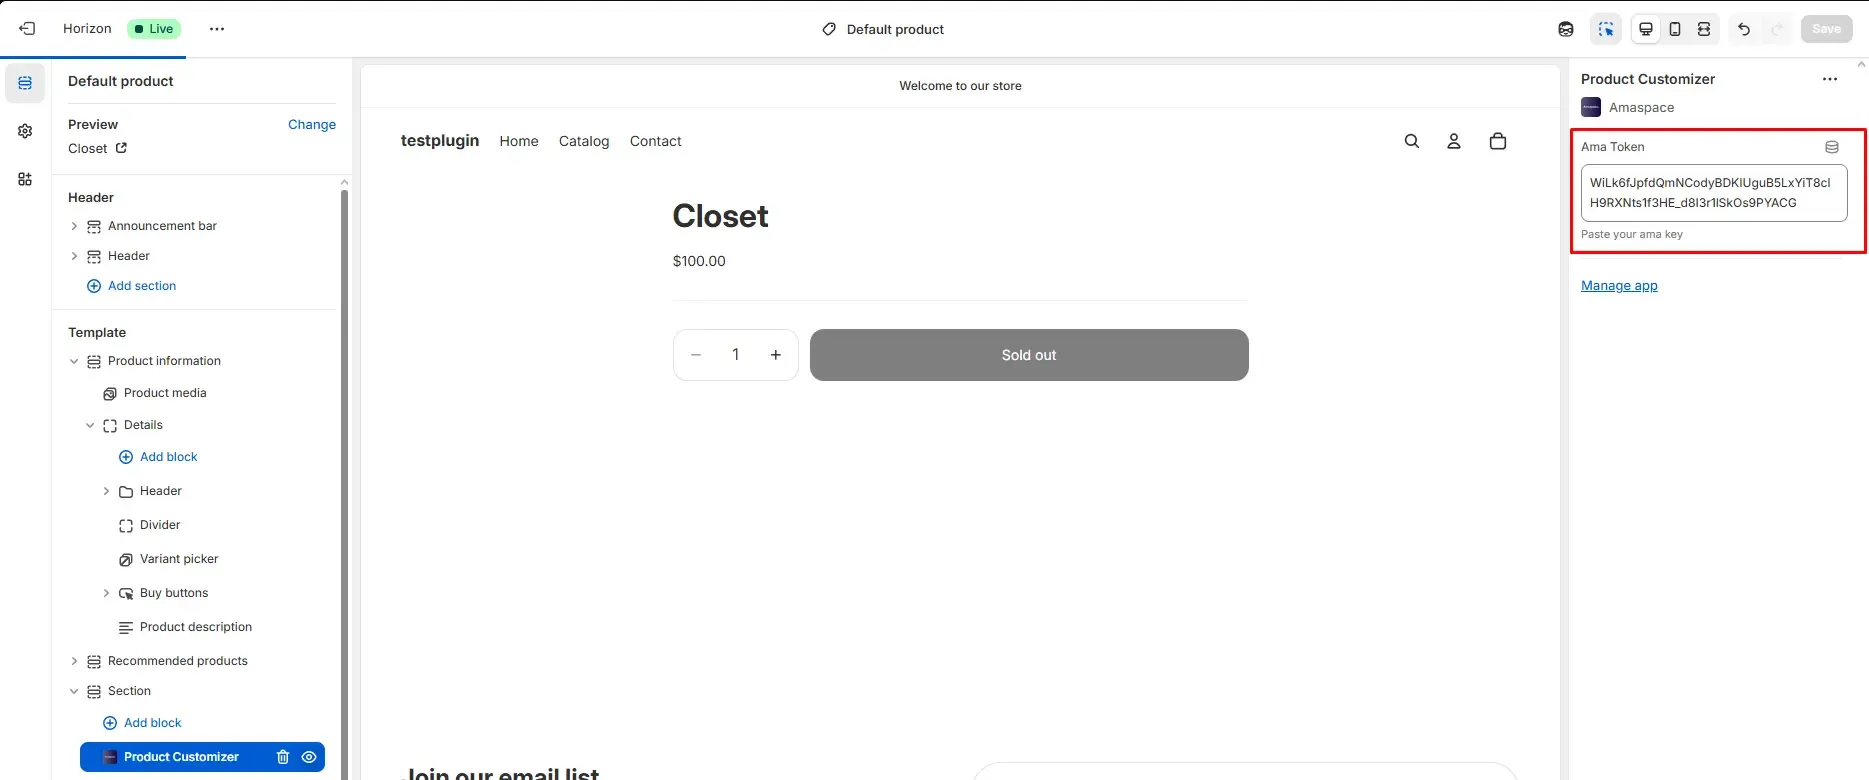
Open https://app.amaspace.co/integrations and copy your Secret API Key

-
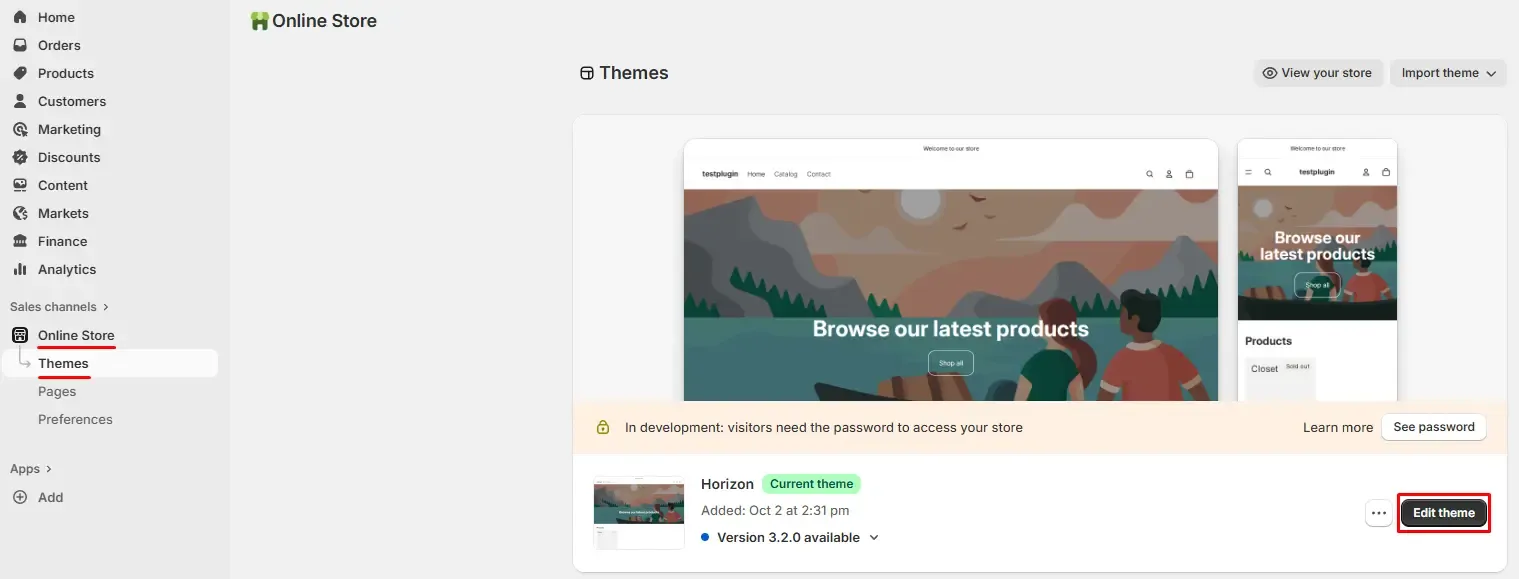
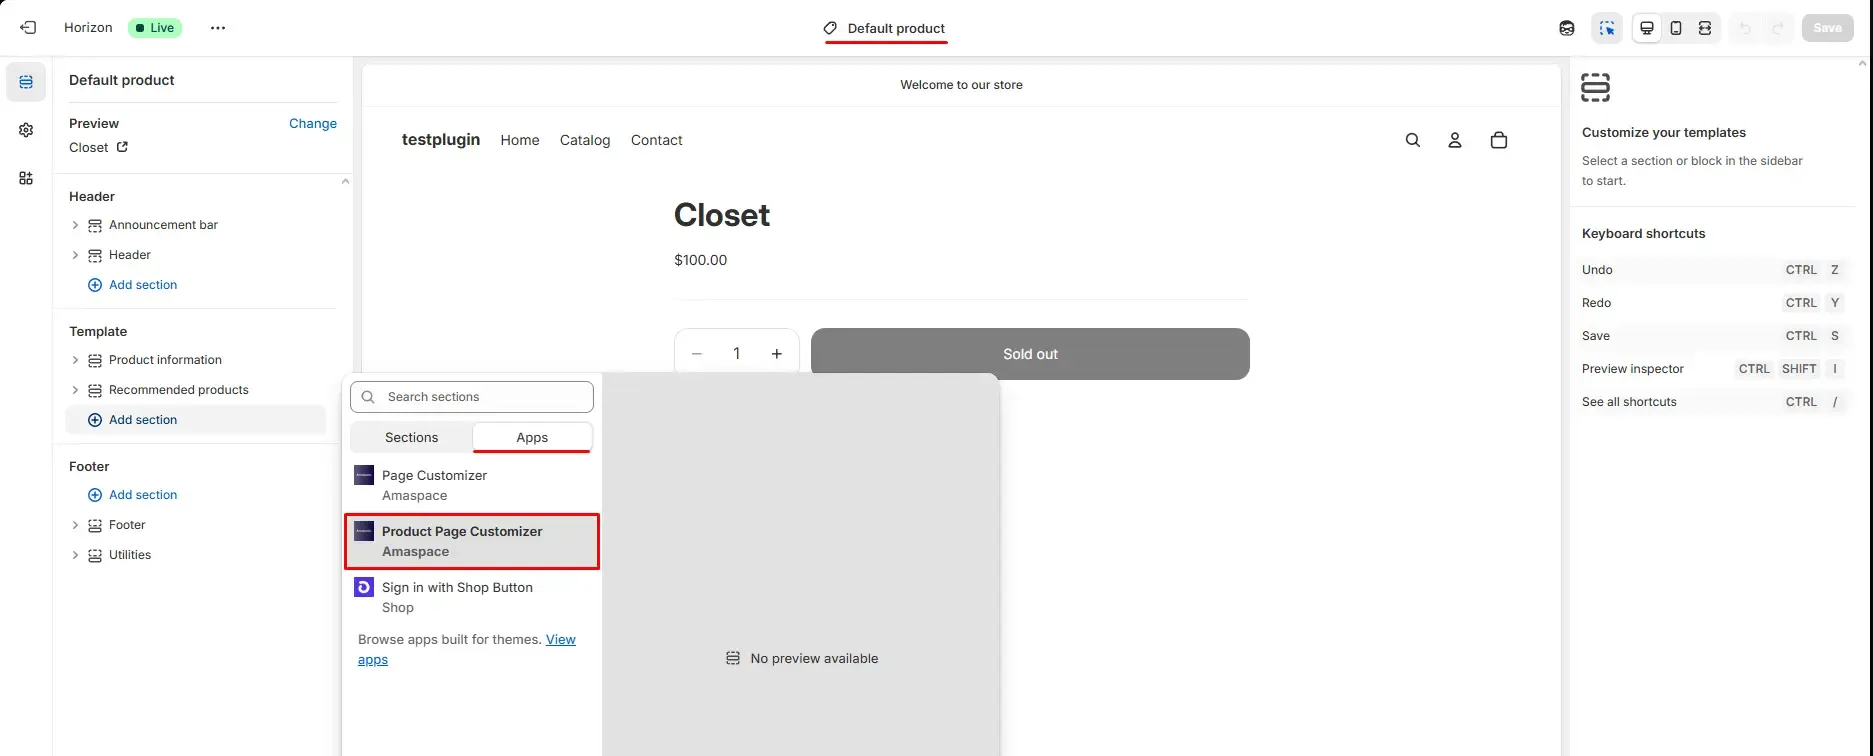
In Shopify admin go to Online Store → Themes → Customize.
-
Product Customizer on a product page (recommended)
-
Open your Product template.
-
Click Add section → Apps → Product Page Customizer.
-
In the block settings, paste your Secret API Key / Ama Token.
-
Click Save.
If the product is linked as in Step 4, the correct configurator will appear on this product page and each configuration will be stored as a variant.
-
Page Customizer on any page
-
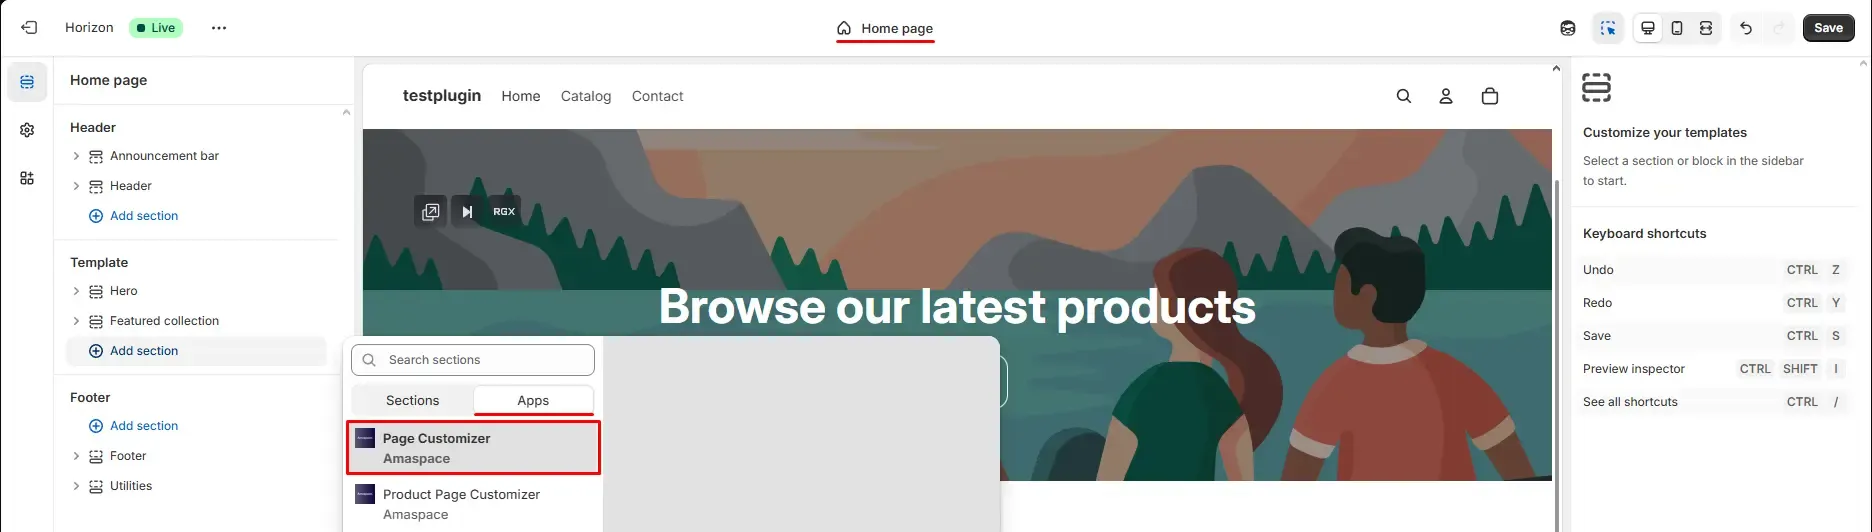
In the theme editor, open the page template where you want the configurator (home, landing, custom page, product, etc.).
-
Click Add section → Apps → Page Customizer.
-
Paste your Secret API Key / Ama Token into the settings.
-
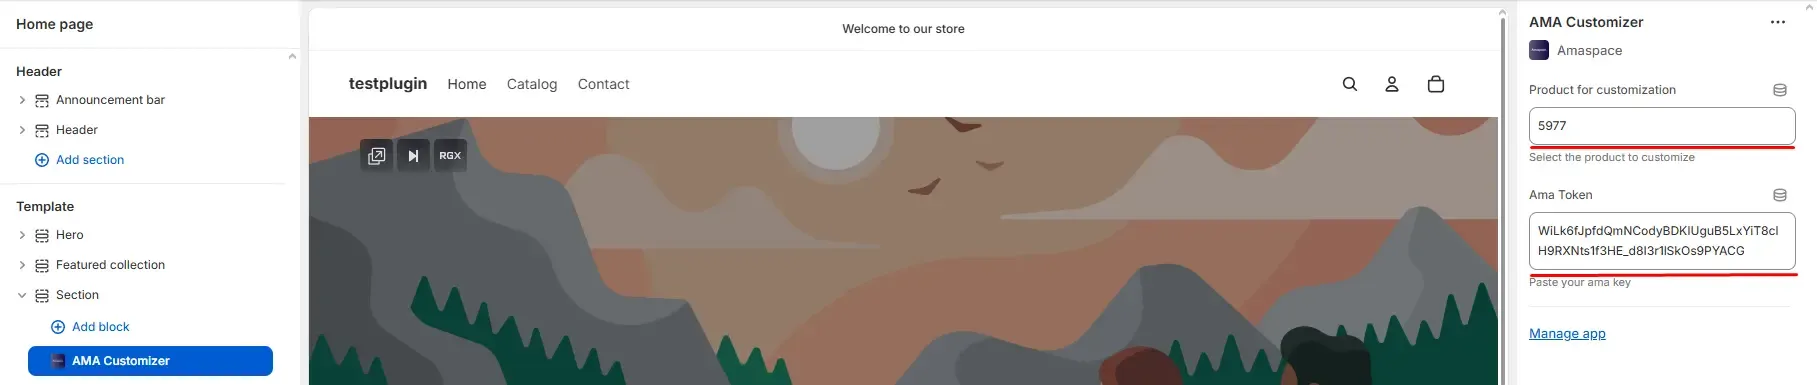
In Product for customization, paste the Product ID from Amaspace (https://app.amaspace.co/catalog ).
-
Paste your Amaspace Product ID** **into the settings.

-
If you leave this field empty, the first published product in your Amaspace catalog will be shown by default.
-
Click Save.
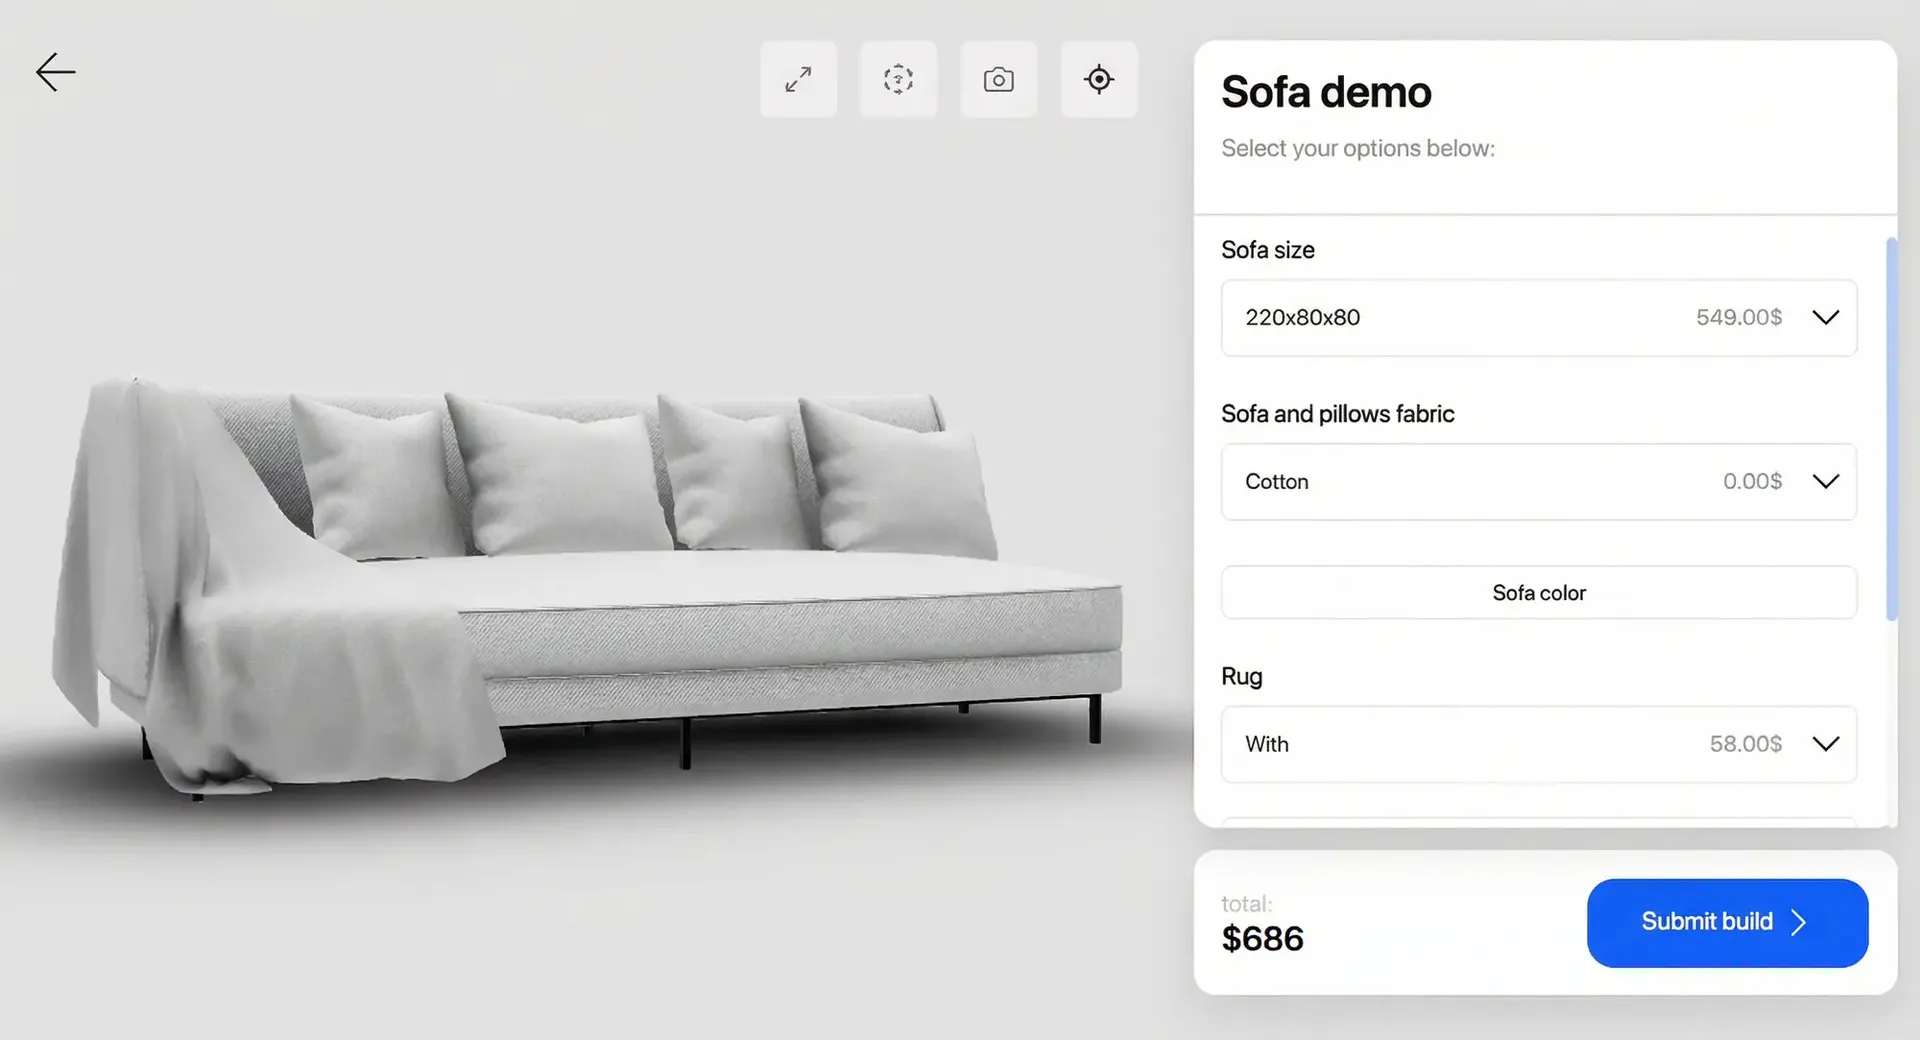
Step 6 — Your configurator is live 🎉
Your Amaspace configurator is now connected and visible in your Shopify store.
Product Customizer vs Page Customizer (detailed explanation)
Amaspace provides two ways to embed a 3D customizer in Shopify.
They look similar on the storefront but behave very differently in Shopify.
Choosing the right option prevents duplicated products and checkout issues.
Product Customizer
Product Customizer works inside an existing Shopify product.
You add the customizer directly to a product page, and customers configure that product visually.
How it works:
- Uses an existing Shopify product
- Does not create new Shopify products
- Saves the configuration as part of the order
- Keeps your product catalog clean
When to use it:
- You already have products in Shopify
- Visual options don’t change product structure
- You want a standard Shopify checkout flow
Typical use cases:
- Furniture with color or material options
- Apparel with prints or textures
- Accessories with visual variations
Page Customizer
Page Customizer works independently from Shopify products.
You can place it on any page, and each configuration creates a new Shopify product automatically.
How it works:
- Can be embedded on any page
- Creates a new Shopify product per configuration
- Sends fully configured products to checkout
- Supports complex pricing and logic
When to use it:
- Products are made-to-order
- Final price depends on configuration
- You don’t want predefined SKUs
Typical use cases:
- Custom furniture or interiors
- Boats, yachts, vehicles
- Industrial or premium manufacturing
Quick comparison
| Feature | Product Customizer | Page Customizer |
|---|---|---|
| Uses existing Shopify product | ✅ | ❌ |
| Creates new Shopify products | ✅ | ✅ |
| Works only on product pages | ✅ | ❌ |
| Can be placed on any page | ❌ | ✅ |
| Supports complex logic | ✅ | ✅ |
FAQ:
Issue 1: The customizer doesn’t appear on the storefront
If the page loads but the customizer is missing, check the following:
- The app block is added to the correct page
- The theme changes are saved
- You’re viewing the same page type you configured (product vs custom page)
Open the theme editor again and confirm the Amaspace block is visible and enabled.
Issue 2: A new product appears in Shopify unexpectedly
This usually happens when AMA Customizer is selected instead of Product Customizer.
AMA Customizer creates a new Shopify product for each configuration by design.
To avoid this:
- Use Product Customizer for existing products
- Review the detailed comparison section later in this guide